 This week i plan to finish rigging my character and get my script/storyboard sorted. As well as doing some PPD work.
Friday, 15 October 2010
next week plan - timetable
This week i plan to finish rigging my character and get my script/storyboard sorted. As well as doing some PPD work.
Thursday, 14 October 2010
Foot/leg rigging sliders

The next thing ive pretty much worked out this week is how to rig my characters foot. The Rigging guide i have from last year shows how to make a bone set up for a foot that can roll forward on the ball of its foot, but this year that set up doesn't have enough points/bones to work perfectly with my character. So i had to find a way around the problem, initially i was going to have a go at just altering the xpresso set up to do the same thing with an extra joint in there, which i think is possibly but would be time consuming, so instead i decided to try to make a separate slider which will sit in the foot controller next to the foot roll slider to make it easy to animate. The extra slider will rotate the upper section of my character foot, because at the minute, the normal foot roll moves both sections of the foot at the same time and by the same amount. By having this extra slider, both segments of the foot will move at the same time, but the upper section needs to rotate slightly more to look right. Ive tested to see if this will work and had no problems getting it to work, i just added a user data to the object that would be the controller, and i set up a range mapper in expresso and told it i wanted it to affect the foot segment and set up with direction he foot should rotate in.
rigging my character soft ik
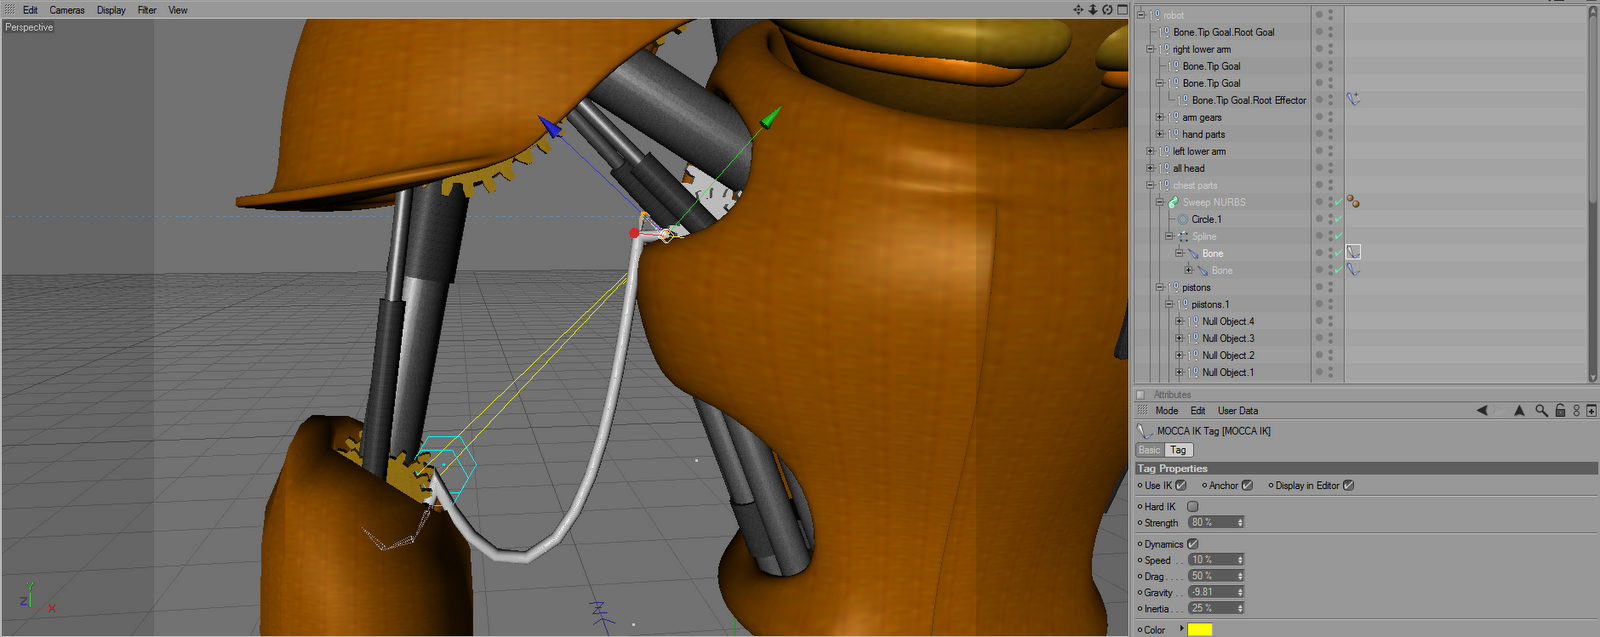
To make the tube parts of my character hang and move under their own gravity i had to work out how to set up a soft ik bone chain to affect the splines, and working out how to make the two ends hang between different objects.
Getting this to work is quite easy, I spimply made my spline and put it in a sweep nurbs with a circle to make a tube. Then used the bone tool to create a chain of bones along the spline. Then i placed the bones in the spline, and i unchecked the smart bone option aswell as changing the function drop down box as this setting pretty much effects how much the spline droops or how harsh the curve and the tolerance in the chain is. After this i fixed the bones in place, and used the setup IK chain option. In the IK settings i turned hard IK off and turned dynamics on. Doing this makes a spline that can hang under its own gravity and move realistically. To make the bones hang between two different objects i just placed the goal object inside the object i wanted the chain to hang between and the chain itself was placed in the other object, in my case this is the chest.
blog update
Last week i got my script pretty much in order, and ive done a bit on my storyboards today, but both need a little bit of tweaking.
This week ive been getting my Robot model in order to be rigged and working out how to go about rigging each part of my character. Through the week i finished off some of the last details of my character, but my plan to add rivets to its body didn't work because i started getting random lines and stretching textures coming from my character. I'm not sure if this was because the rivets messed something up, the polys were too high, I'd placed something in the wrong place in the hierarchy, or it was just my cinema 4D being strange. Either way I'm going without the rivets for now and will add them later, possibly as textures.
Other than sorting out the last details, i had to spend some time splitting the symmetry's apart and optimising my character, which took a which because i need all the parts of my character to be separate objects, and all the symmetry's converted to objects that were joined together, and deleting the other halves to make single object left a lot of blank points. So i went through each part of my character an optimized it to remove the unwanted points. Now that my character is all separate all that is left to do is get all the axis' in the right place so the objects move properly when rigged.
Other that making my character riggable, ive been working out how to rig it up.
Saturday, 9 October 2010
robot eyelid shutters
 Since I need shutter eyelids on my robot to show expressions, i thought i should get this done now so my model sheet is good to go whenever i need it.
to get the shutters to work my first idea was to use morph tags so that i could move the points and hide them inside the goggles and have the shutters morph out. I decided this was a stupid idea quite quickly as it was tedious and wouldn't work. Then i had the idea to use a boole object to hide the shutter when its outside of the goggle so it wont show in the render. I used a torus object since i decided it was a good enough primitive for it, and made it the right size. I think this works perfectly and should animate well, giving a good amount of movement on the eyelid.


Thursday, 7 October 2010
HDRI render

While researching animaiton techniques i looked at HDRI lighting and decided to try it in a scene with my character. Apart from looking a bit plasticy, im really pleased and impressed with the result. It's a shame i couldn't use HDRI in my animation, this still of my character by himself took 20 minutes.
first week of second brief
Its the end of the first week of the second brief and i haven't done much work on my blog, as i chose to make my character in 3D for my model sheets doing that and keeping up with other things is taking up a lot of my time, and keeping up a little difficult. Either way This week i got all my research done, i looked at various 3D animations and animation techniques, I still need to finish my script and get that in order but im fairly sure ill have that done no problems. Despite thinking i may be a little behind on some things, the fact my character is modelled and nearly finished may help me make up some time which i would have used in the next few weeks, but theres still work to do on that, such as rigging.
I'm going to try to catch up on some of the things i need to over the weekend a bit, and should be on track for Monday.
robot progress
 At his point my robot is almost dont, he needs some things changing and some different textures, but other than that it is mainly adding rivets and small deatils.
textures, steam pipes and goggles
 After getting the larger parts of the robot right i started working on getting the texture right, which i think like this is near enough how i want it before adding rust and smaller details.
 I added steam pipes on his back and a part to make it look fixed to his back. I worked on getting the goggles right next, by working out how to make and animate an aperture shutter. It turned out after working out that to animate the aperture i would need to rotate the axis, that to animate it, i needed point level animation switched on. I placed a clow texture behind the shutter and left it at that, still needs some kind of eye lid shutters to hep get expressions across.


When i had got my robots torso to look right i started work on the feet. The feet once again were all box modelled starting with cubes and moving the points, and then being placed in a hypernurbs. I had used a symetry object for each segment of the feet, and i liked the way the split feet looked, so i was unsure if i should leave the split down the centre of the foot. I ended up leaving the split foot on the middle two sections.
 I got the shape roughly right before tweaking the shape more. I decided that the neck line should be tilted forward more so that the head was set back into the torso more. I also added pistons to see how it would look at this point.
 After several more alterations i extruded the holes to give a thickness to the body.

 I started on the robots torso next, and added in a sphere to be a place holder for the head to get the scale right. The sphere started as a cube with several subdivisions which I made editable and moved the points into place. I made holes by deleting some polygons and continued modelling
the torso by extruding upwards and moving points.
robot progress

I started my robot based on some very basic elevations i drew which at least helped with the scaling.
Initially I modelled the shoulders, I did this by basically box modelling, I started with a sphere which I cut in half and moved the points into place. I then extruded the object several times to get the shape I wanted, then the shoulder was placed in a hypernurbs and a symmetry object.
Friday, 1 October 2010
Back to college
This is my first post since before the summer, and i will be posting some updates to get my blog up to date.
During the summer i did some work comming up with my idea for the task we were set for the summer. My character idea is a steam powered steampunk style robot. My initial idea was that somehow the robot gains powered through a strange energy source being gathered by an alien race.
Since returning to college my idea has developed and progressed as i felt my initial idea was quite cheesy and generic. But i have kept the initial concept of a steam powered robot in an industrial steam powered world.
Now the idea has progressed into a robot that is now coin activated, and a coin finds its way into the robot and powers it on, and the robot proceeds to walk around and expolre seeing the estroyed world around him that is so different to what he remembered.
After getting my idea for my character down and developing some of my concept drawings, dave said it would be a good idea to do my model sheet in 3D, and i liked the idea, so i had to make my character in 3D which i knew would be quite time consuming.
I will post some pictures now to sow the progression of my 3D model and how its coming along so far.
Subscribe to:
Comments (Atom)